a.k.a. "Iron Horse". This is the build of my Berkeley Engineering 'Perfect 10' Mini Tugboat.
Sunday, June 10, 2012
Scarf joints cut and epoxied, keel rounded and taped
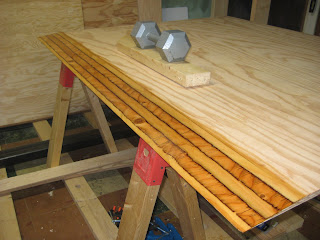
Over the last couple weeks the weather has been one of two ways, very hot and humid or very cold and rainy. Not exactly the most motivating but, I'v managed to work on a few different areas. I finished cutting my scarf joints on the three bottom hull pieces and applied a couple coats of epoxy and epoxy wood filler to fill the end grain, holes etc. I wanted to precoat the end grain to ensure the final joining goes together wet and I don't get any dry spots. The keel has been rounded over with a 1/2" roundover bit and I've applied the 3" 9oz. cloth tape to all 5 rounded edges. Today I will be sanding the keel to feather out the glass tape edges. I hope to get the 6oz glass cloth applied Monday or Tuesday evening. The photos here show my most recent progress. Cutting the scarf joints was a messy job!
Thursday, April 26, 2012
A few more things done...setting up the garage/Sourcing supplies
I've removed the transom from the jig and everything looks good. When building my jig I used standard 2x4 stock for setting the transom curvature, this gave me about 2 1/2" curvature when formed in the jig. With the transom out of the jig and a few days passed, the curvature is now sitting at 2 3/16", well with in the 2"-3 1/2" range the plans call for.
The past couple of days I have cut out my front cabin and two side 1/4 panels to the rough 16"x32" shape, these will be cut and fit in place later on. I've also setup a table in the garage using a few 2"x10"x8' boards that will span across a couple saw horses to create a table to work on. This should be quick and easy to take down and set up when needed.
During my last trip to the Home Depot I was disappointed to find out they stopped carrying the Norton line of sanding discs! They now carry the Freud line and the price is much higher at $1.45/disc. I can't seem to find anyone in town that stocks the 6" sanding disc so I ended up ordering some off ebay, 200 discs at 30 cents a piece....can't beat that! I'm also having a hard time finding cheap chip brushes. The lowest price I could find for a 2" chip brush is $1.50ea. Harbor Freight has packs of 36 for $10.99. I guess I'll be making a stop at Harbor Freight the next time I cross the boarder.
Tuesday, April 17, 2012
Transom glued up and molded in Jig/Hull Floor pieces cut out.
Well, it's been a while since my last post...quite a while! I've continued to work on keel, filling, filleting etc. I still have to round over the edges with a 1/2 router bit then fill and sand some more before starting the outer glass and epoxy. I'm working in my basement and don't have the best ventilation so I'll be waiting for a good day to move the keel outside and get the sanding and routing done in one shot. The last two weekends I cut out the hull floor pieces and transom pieces. I also got around to building the transom jig and epoxied the transom pieces together and set them up in the jig for molding. I didn't expect the transom pieces would need as much epoxy as they did. I used 23oz in total to get a good wet coat that I felt comfortable with. I used a few screws to dry fit and align the 4 pieces before fitting them into the jig where I used an even grid pattern of 40 or so screws to make sure the center section of the keel would be evenly clamped. The outside 5 inch perimeter used up about 40 different sized C and spring clamps to finish it off. The photos below show some of the most recent work.
Subscribe to:
Comments (Atom)


